The Dynamics panel
Any Bell, shelf or tilt band in JustAnother EQ can be dynamic: instead of a fixed boost or cut, it moves its gain only when the level goes over a threshold. A dynamic band runs in one of two modes, Broadband (Dynamic EQ) or Spectral (Spectral dynamics). Switch dynamics on with the Dynamics icon on the band card, and the Dynamics panel slides out on the card’s right side. It sets when the band reacts (Threshold), how far it moves (Range) and how fast (Attack and Release).
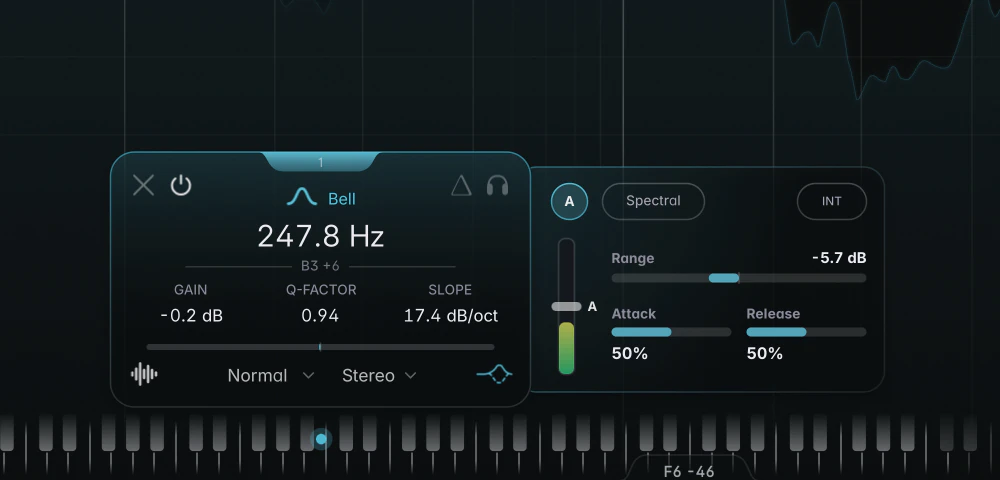
Along the top of the panel sit the “A” (Auto Threshold) button, the Spectral pill, a toggle that depends on the mode (Transient Focus in Spectral, or the Zero Latency toggle in Broadband while in Linear Phase) and the sidechain pill (“INT” or “EXT”, see Sidechain). Below them are the vertical Threshold strip, Range, Attack and Release, plus two extra sliders in Spectral mode.
Spectral pill
Click the Spectral pill to switch the band between Broadband (unlit) and Spectral (lit in the band colour). Each mode remembers its own Attack and Release, so switching swaps them. Choosing Spectral usually adds latency; see Spectral dynamics.
Threshold
Drag the Threshold strip up or down; double-click it to reset it. The meter inside shows the band’s detector level. When the meter rises above the handle, the band is working.
- Broadband: the level at which the band starts to react, from -90 to 0 dB (default -45 dB), with a soft knee around it.
- Spectral: how far a frequency must stick out above its neighbours before it’s turned down, from 0 dB (every little peak) to 24 dB (only extreme peaks), default 12 dB.
Auto Threshold
The round “A” button switches Auto Threshold on or off (on by default). With Auto on, the threshold follows your material, and the strip trims it:
- In Broadband, the threshold sets itself just below the recent peaks in the band, so the loudest moments can use the whole Range. The strip trims it by up to 8 dB in either direction.
- In Spectral, the threshold follows how far the band’s peaks stick out above the rest of the signal, reacting quickly to new peaks and relaxing slowly. The strip shifts it by up to 10 dB in either direction.
We recommend leaving Auto on for most material, so the band reacts the same way when the input level changes. Switch it off for a fixed trigger point, for example to catch only the loudest hits.
Range
Range sets how far, and which way, the gain can move: from -24 to +24 dB (default -6 dB). Negative values cut and positive values boost, both when the level goes above the threshold. The band’s gain plus its Range always stays within -24 to +24 dB, so a band already boosted to +20 dB can only move up another 4 dB.
Attack and Release
Attack sets how fast the band moves once the threshold is crossed; Release how fast it returns. Both run from 0 to 100 % (defaults 50 % / 50 % in Broadband, 15 % / 25 % in Spectral).
The percentages aren’t fixed times: the real timing depends on the mode and the band’s frequency. Low bands move more slowly, so they don’t chase individual bass cycles, and high bands move faster. Hover over Attack or Release (with Show hints on in Settings) to see the actual time in ms for the band’s frequency.
Several bands selected
The panel appears for a multi-selection when every selected band has dynamics on. Every control then edits all of them and keeps their differences; differing values show a “low - high” readout.
Notes
- The Broadband/Spectral choice is saved with your session and in presets but can’t be automated, because it changes the latency. The other dynamics controls can be automated (see Automation and host parameters).